There are some additional steps you can take to enable the limited OctoPrint user to do more, as well as some choice plugins that will make your OctoPrint experience better. Here I will take you through some of those steps.
I’m assuming you have followed my earlier blog post about how to Setup Octoprint from scratch, and you have created a virtual environment for Python to execute in, as well as a dedicated “octoprint” user.
We will start by ssh’ing across
ssh octo@octopi
Enable Limited Sudo
Create a new sudoers file for “octoprint”
sudo vi /etc/sudoers.d/octoprint
In this file, add the contents:
octoprint ALL=(ALL) !ALL
octoprint ALL=NOPASSWD: /usr/sbin/reboot
octoprint ALL=NOPASSWD: /usr/sbin/service octoprint restart
octoprint ALL=NOPASSWD: /usr/sbin/shutdown -h now
The first command explicitly denies any sudo command, and the following commands are then allowed or whitelisted. The “NOPASSWD:” directive indicates that the user does not need to enter a password for the command to run (typically, a sudo command would require authentication with a password before it would allow the command to run)
The opened up commands are the (onyl) commands that the octoprint user is allowed to execute. Explicit paths are used, and the arguments that can be fed to the command are fully defined.
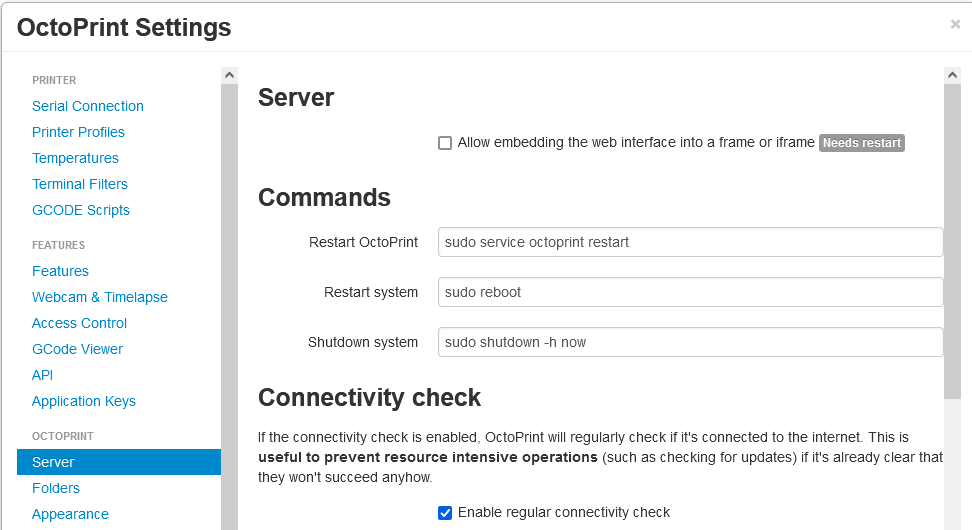
Within OctoPrint, you can place appropriate entries (full path does not need to be included) that match the above commands with exactly the same arguments as above:
OctoPrint Plugins – Simple
There are a number of plugins that make the whole OctoPrint experience a bit better. Add Plugins by hitting the spanner icon in the NavBar, going to the Plugin Manager and hitting “Get More”
Here is a list of the current plugins I am using:
- OctoPrint-PrintTimeGenius (Eyal)
- OctoPrint-DisplayLayerProgress (Olli)
- OctoPrint-Dashboard (j7126)
These three play together to offer a much richer overview of the printer status.
- OctoPrint-FloatingNavbar (jneilliii)
- Navbar Temp (Cosik, Jarek Szczepanski)
- Simple Emergency Stop (Sebastien Clement)
These provide useful information in the NavBar, lock the navbar at the top of the window (floating when the page scrolls) and gives you a big red Emergency stop button
Octoprint Plugins – Complicated
The next two plugins need a little more attention, and may even require some firmware support.
- OctoLapse (Brad Hochgesang)
- Firmware Updater (Ben Lye, Gina Haussge, Nicano Romero Venier)
Octolapse
If you followed my earlier blog post, you should have already pre-installed the python3-dev package that is a pre-requisite for OctoLapse.
If you need to install it, then install it from apt
sudo apt-get install python3-dev
Then install OctoLapse from the “Get More” plugins page
Excellent instructions on how to set this up are available on the Octolapse Wiki pages
https://github.com/FormerLurker/Octolapse/wiki/V0.4—Getting-Started
I’ve not yet gone through that configuration, so I plan to update this post as and when I get to that part of my setup
Firmware Updater
In some cases, you may have to make more firmware changes and/or install additional components for your specific setup.
Find detailed instructions on the FirmwareUpdater page: https://github.com/OctoPrint/OctoPrint-FirmwareUpdater
LPC176X Specific Setup (E.g. BTT SKR 1.4/1.4 Turbo)
Refering to the LPC176X instructions (https://github.com/OctoPrint/OctoPrint-FirmwareUpdater/blob/master/doc/lpc176x.md)
Firstly, we will need to build target firmware successfully, and once this is done, ensure that SDCard support is switched on
Enable SD Card support in Configuration.h
Configuration.h
#define SDSUPPORTDon’t auto-mount SD card at start up, and use Onboard SD Card
Configuration_adv.h
#define SD_IGNORE_AT_STARTUP
.
.
.
#define SDCARD_CONNECTION ONBOARD
This will enable access to the SD Card over the same USB link as the Serial port (multi-device compatible)
Build the firmware file and drop it onto your SD Card, then insert this into the board and hit the reset button
On the Raspberry PI, run the command dmesg and you should see an entry much like this:
[  290.896458] usb 1-1.4: USB disconnect, device number 3
[  293.762842] usb 1-1.4: new full-speed USB device number 4 using xhci_hcd
[  293.874658] usb 1-1.4: New USB device found, idVendor=1d50, idProduct=6029, bcdDevice= 1.00
[  293.874678] usb 1-1.4: New USB device strings: Mfr=1, Product=2, SerialNumber=3
[  293.874689] usb 1-1.4: Product: Marlin USB Device
[  293.874700] usb 1-1.4: Manufacturer: marlinfw.org
[  293.874710] usb 1-1.4: SerialNumber: 0F012006AF6998A95E422650F50020C3
[  293.887509] cdc_acm 1-1.4:1.0: ttyACM0: USB ACM device
[  293.890579] usb-storage 1-1.4:1.2: USB Mass Storage device detected
[  293.894630] scsi host0: usb-storage 1-1.4:1.2
[  294.909264] scsi 0:0:0:0: Direct-Access     Marlin   SDCard 01        1.0  PQ: 0 ANSI: 0 CCS
[  294.909592] sd 0:0:0:0: Attached scsi generic sg0 type 0
[  294.909958] sd 0:0:0:0: [sda] 62333952 512-byte logical blocks: (31.9 GB/29.7 GiB)
[  294.911364] sd 0:0:0:0: [sda] Write Protect is off
[  294.911376] sd 0:0:0:0: [sda] Mode Sense: 00 00 00 00
[  294.913856] sd 0:0:0:0: [sda] Asking for cache data failed
[  294.913865] sd 0:0:0:0: [sda] Assuming drive cache: write through
[  295.190217]  sda: sda1
[  295.195879] sd 0:0:0:0: [sda] Attached SCSI removable disk
This indicates that the device is available immediately. To make this more useful, we need to make the system automatically mount it in a convenient location (typically /media/usb or similar)
As the UDev system provides a mechanism to respond to these hardware events, we can take advantage of that to run a script and mount the device for us. This is not my own work, I will use the information from https://www.andreafortuna.org/2019/06/26/automount-usb-devices-on-linux-using-udev-and-systemd/ and make a small adaptation for this solution.
First, create our mounting script
sudo vi /usr/local/bin/usb-mount.sh
#!/bin/bash

ACTION=$1
DEVBASE=$2
DEVICE="/dev/${DEVBASE}"

# See if this drive is already mounted
MOUNT_POINT=$(/bin/mount | /bin/grep ${DEVICE} | /usr/bin/awk '{ print $3 }')

do_mount()
{
    if [[ -n ${MOUNT_POINT} ]]; then
        # Already mounted, exit
        exit 1
    fi

    # Get info for this drive: $ID_FS_LABEL, $ID_FS_UUID, and $ID_FS_TYPE
    eval $(/sbin/blkid -o udev ${DEVICE})

    # Figure out a mount point to use
    LABEL=${ID_FS_LABEL}
    if [[ -z "${LABEL}" ]]; then
        LABEL=${DEVBASE}
    elif /bin/grep -q " /media/${LABEL} " /etc/mtab; then
        # Already in use, make a unique one
        LABEL+="-${DEVBASE}"
    fi
    MOUNT_POINT="/media/${LABEL}"

    /bin/mkdir -p ${MOUNT_POINT}

    # Global mount options
    OPTS="rw,relatime"

    # File system type specific mount options
    if [[ ${ID_FS_TYPE} == "vfat" ]]; then
        OPTS+=",users,gid=100,umask=000,shortname=mixed,utf8=1,flush"
    fi

    if ! /bin/mount -o ${OPTS} ${DEVICE} ${MOUNT_POINT}; then
        # Error during mount process: cleanup mountpoint
        /bin/rmdir ${MOUNT_POINT}
        exit 1
    fi
}

do_unmount()
{
    if [[ -n ${MOUNT_POINT} ]]; then
        /bin/umount -l ${DEVICE}
    fi

    # Delete all empty dirs in /media that aren't being used as mount points.
    for f in /media/* ; do
        if [[ -n $(/usr/bin/find "$f" -maxdepth 0 -type d -empty) ]]; then
            if ! /bin/grep -q " $f " /etc/mtab; then
                /bin/rmdir "$f"
            fi
        fi
    done
}
case "${ACTION}" in
    add)
        do_mount
        ;;
    remove)
        do_unmount
        ;;
esac
Finally, add execute permissions with sudo chmod +x /usr/local/bin/usb-mount.sh
Now we can create the systemd mount service that udev will invoke
sudo vi /etc/systemd/system/usb-mount@.service
[Unit]
Description=Mount USB Drive on %i

[Service]
Type=oneshot
RemainAfterExit=true
ExecStart=/usr/local/bin/usb-mount.sh add %i
ExecStop=/usr/local/bin/usb-mount.sh remove %i
Finally, add some UDev rules to invoke this for us when the SDCard is inserted or the USB port is connected
sudo vi /etc/udev/rules.d/99-usbmount.rules
KERNEL=="sd[a-z][0-9]", SUBSYSTEMS=="usb", ACTION=="add", RUN+="/bin/systemctl start usb-mount@%k.service"
KERNEL=="sd[a-z][0-9]", SUBSYSTEMS=="usb", ACTION=="remove", RUN+="/bin/systemctl stop usb-mount@%k.service"
Finally, reload the udev and systemd rules:
sudo udevadm control --reload-rules
sudo systemctl daemon-reload
Plug in the SD Card and check that the device is mounted:
mount
.
.
/dev/sda1 on /media/sda1 type vfat (rw,nosuid,nodev,noexec,relatime,gid=100,fmask=0000,dmask=0000,allow_utime=0022,codepage=437,iocharset=ascii,shortname=mixed,utf8,flush,errors=remount-ro)
.
.
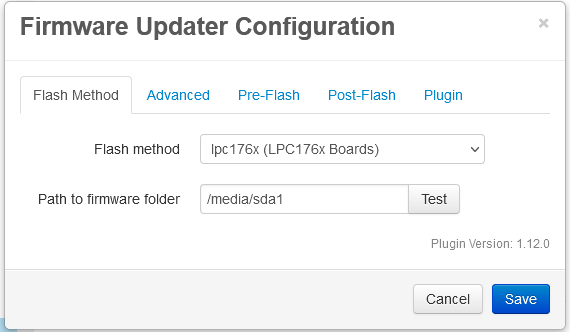
Within OctoPrint, we can now use the location /mount/sda1 as the target for firmware updates
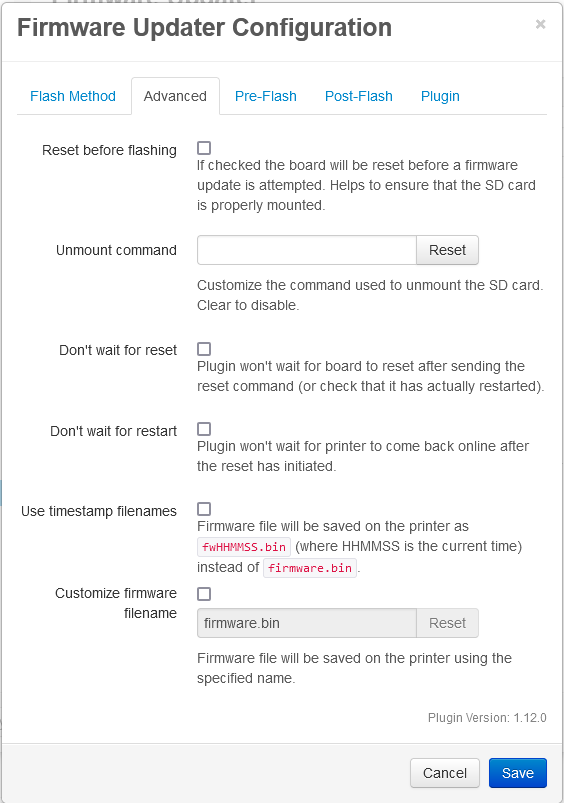
In Advanced settings – clear the “Reset before flashing” option.
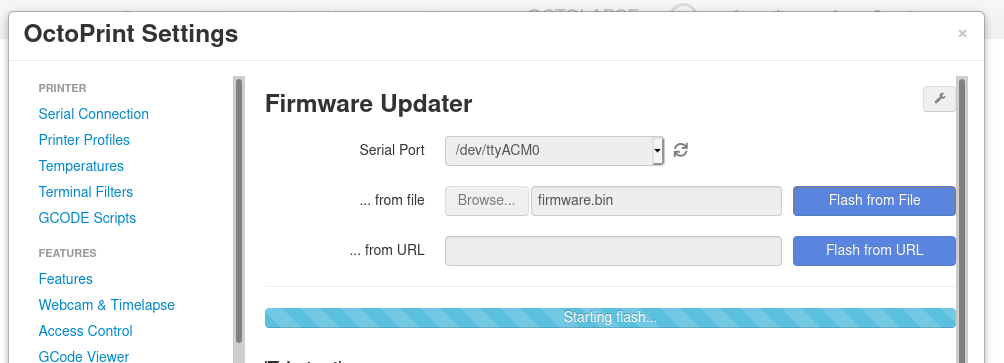
Now you should be able to use the firmware updater main plugin window to select a firmware.bin file and hit “Flash from File” and see the results of the flash process
Leave a Reply
You must be logged in to post a comment.